Table of Contents
WhatsApp Flows in Journeys

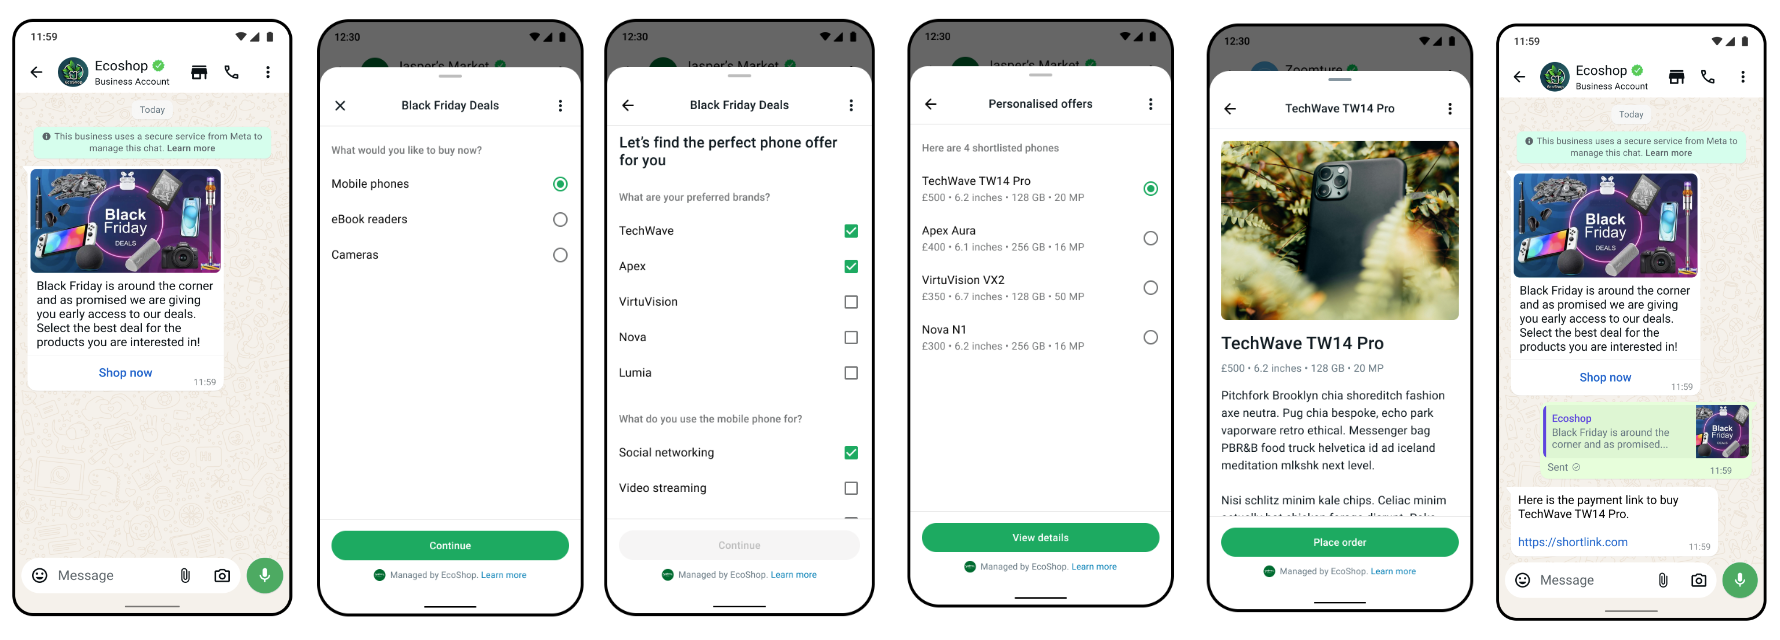
A WhatsApp Flow allows you to have a more structured interaction in your messaging, like a form inside WhatsApp. Think of it as giving customers a range of choices and then drilling down into those choices through various screens to get very accurate and structured information. These choices can be in different formats like text boxes, unique and multiple-choice selections, date pickers, etc (click here for a complete list).
Meta provides an example where businesses guide interested buyers toward a purchase by first showing a high-level overview of available products. Customers can then select their preferences to narrow down to a specific item, ending with a link to complete payment.
Creating a WhatsApp Flow
Flows can be created in the Flows page, under Content:

WhatsApp Flows are created with a coding language called Flow JSON.

Example: creating a simple date picker Flow
When you need to get a date from a user, asking them to type it can be problematic. Users might send "12-08-2025," "next Monday," or "Aug 12," which requires your service to interpret many different formats. The WhatsApp Flows DatePicker solves this by presenting a simple, interactive calendar. This improves the user experience and provides you with a perfectly formatted date, every time.
There are two main steps to get the DatePicker working in your Journeys.
1. Create a new WhatsApp Flow
Give it a name and select a category.
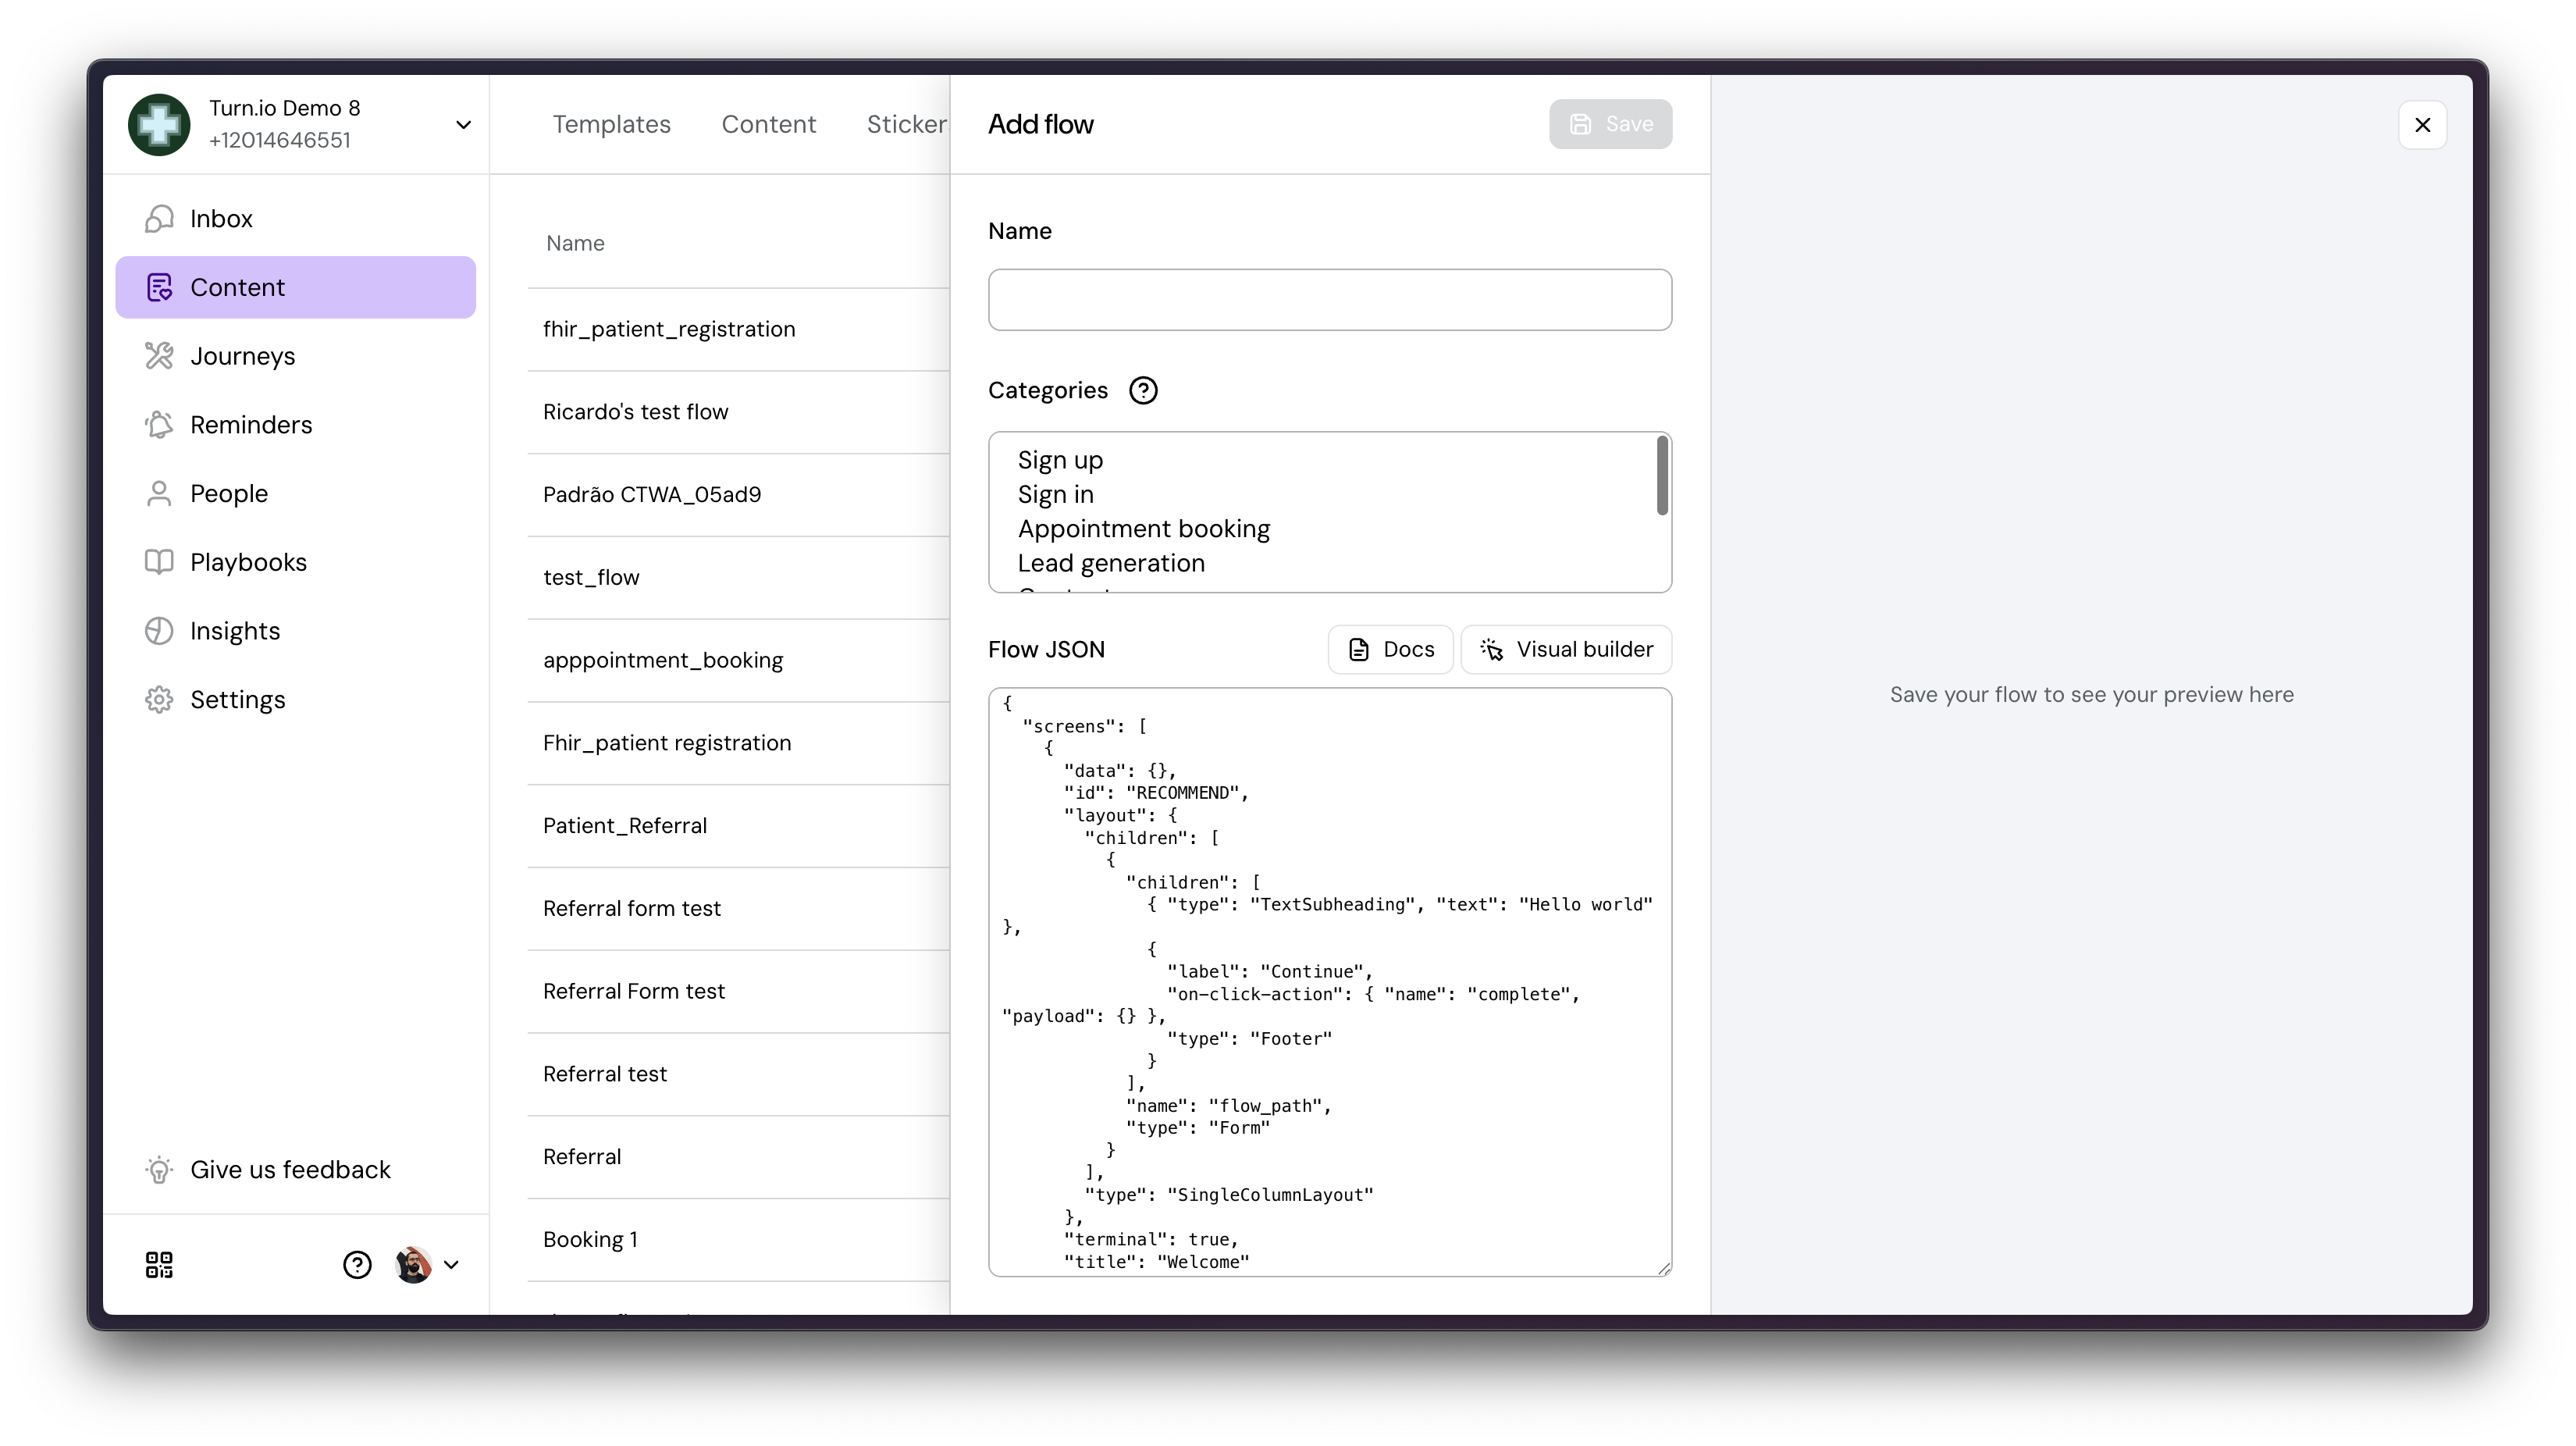
Now, simply copy and paste this code into your Flow and save it:
{
            "screens": [
              {
                "data": {},
                "id": "APPOINTMENT_SCREEN",
                "layout": {
                  "children": [
                    {
                      "children": [
                        {
                          "label": "Your Date of Birth",
                          "name": "Date_of_Birth",
                          "required": true,
                          "type": "DatePicker",
                          "helper-text": "Please select your Date of Birth"
                        },
                        {
                          "label": "Continue",
                          "on-click-action": {
                            "name": "complete",
                            "payload": {
                              "date": "${form.Date_of_Birth}"
                            }
                          },
                          "type": "Footer"
                        }
                      ],
                      "name": "flow_path",
                      "type": "Form"
                    }
                  ],
                  "type": "SingleColumnLayout"
                },
                "terminal": true,
                "title": "Date of Birth"
              }
            ],
            "version": "7.2"
          }
To understand how this code works, expand the Details section below:
Details
Understand the Key JSON Properties
To use this code effectively, you need to know what the key properties do.
id: "APPOINTMENT_SCREEN": This is a crucial piece that is required on the Turn.io side in order to let what screen from this flow to start for a user since a flow can have multiple screens.
type: "DatePicker": This is the essential component that tells WhatsApp to show a calendar interface.
name: "date": This is the identifier for the data you get back. After the user selects a date and clicks "Complete," your service will receive the data with this name (e.g., {"date": "2025-10-20"}).
label: "Pick the date of your appointment": This is the text prompt that is displayed to the user above the calendar selector.
min-date: "2024-09-06": This property is used for validation. In this example, it prevents the user from selecting any date before September 6, 2024.
type: "Footer" and label: "Complete": These properties create the submission button that the user will tap to confirm their selected date. When tapped, the flow will close and send the data back to your service.
The complete documentation for flows can be found at Meta.
Once the code is saved, you can preview what the Flow would look like for an end-user on the right hand side of the flow code.
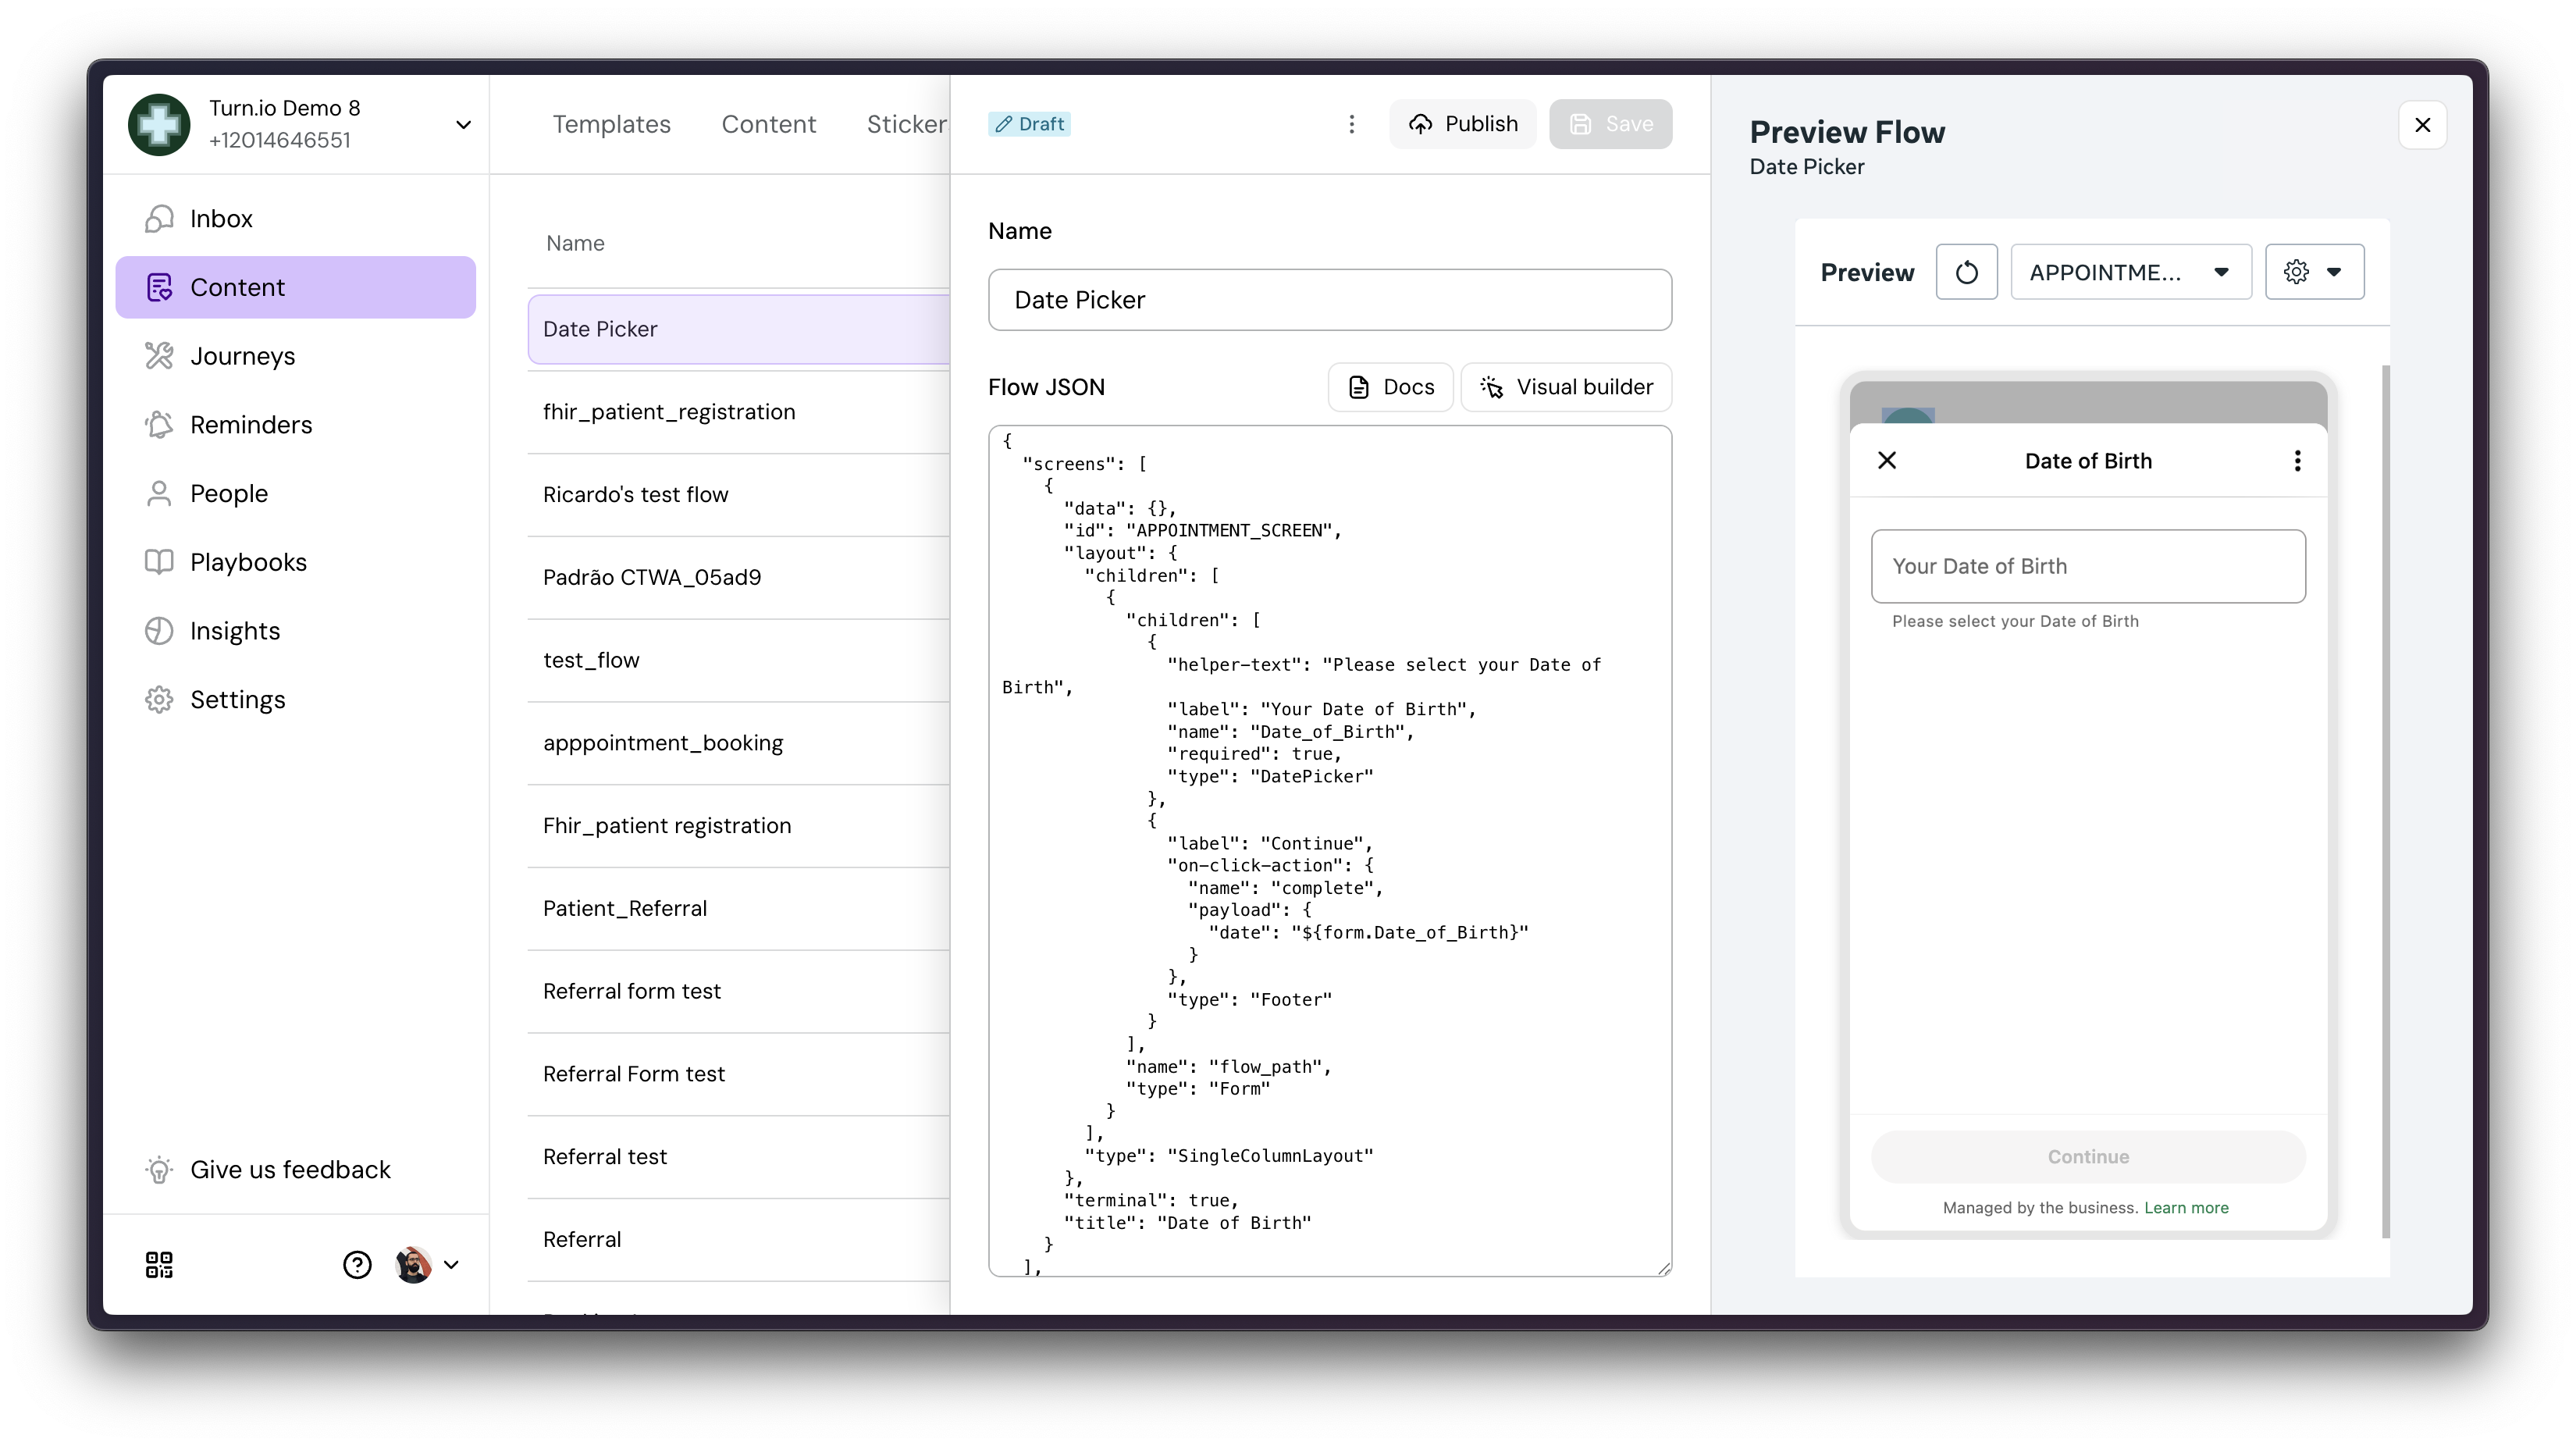
Publish
If you are satisfied with the experience, you can publish the flow, which then makes it possible to use it in a Journey.
2. Call the Flow within a Journey
After having writing, saved and publishing the flow you are now able to use it within Journeys. There are two options:
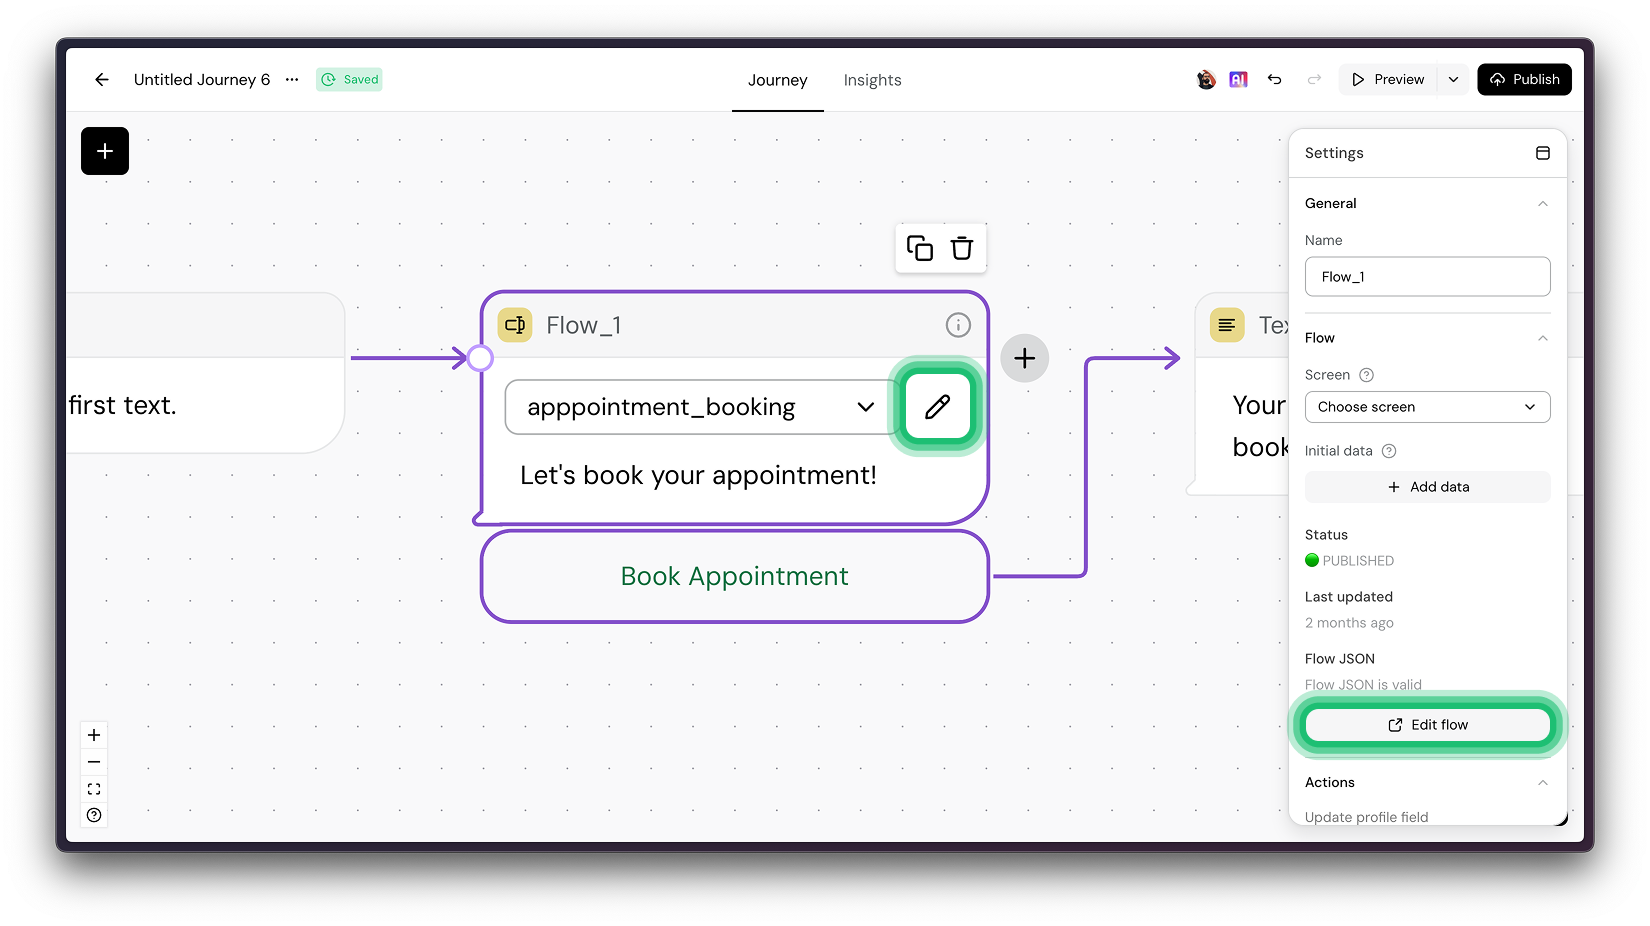
2.1 Use the Flow card
Simply add the new Flow card into your Journey and select the Flow you created:
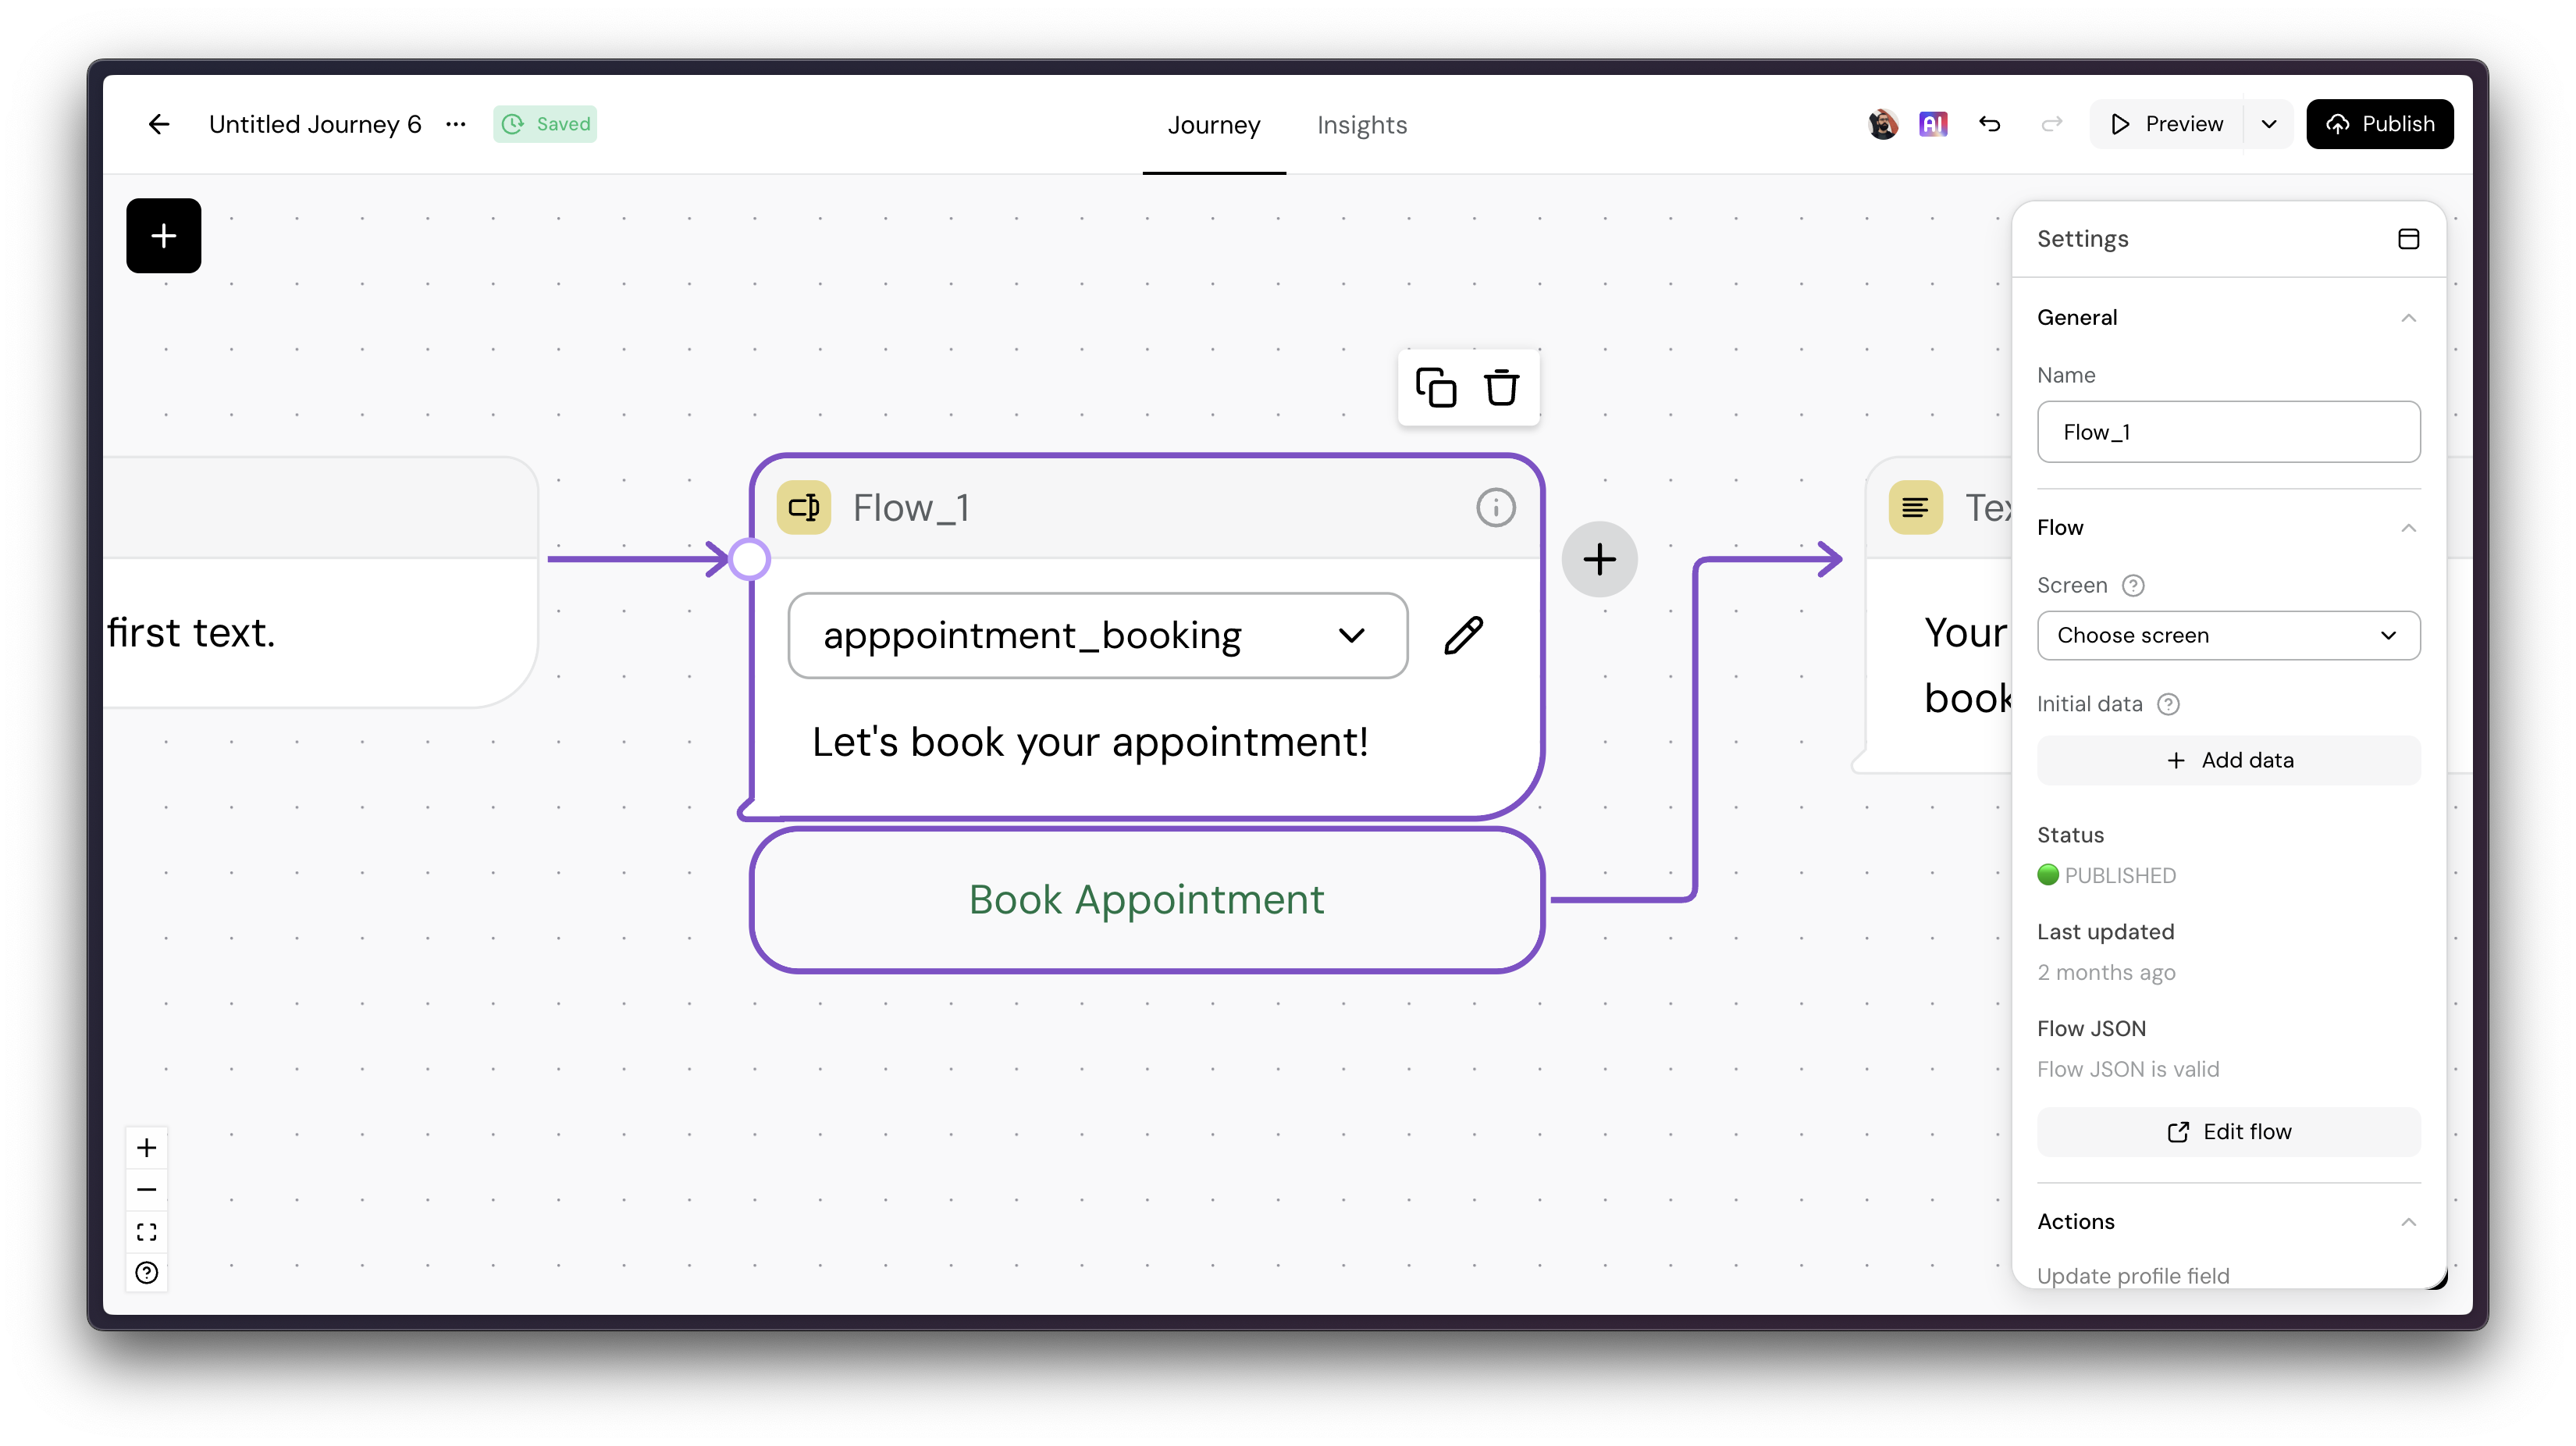
You can also edit your flows directly from Journeys:
If you need to access the results of your Flow, simple use the card's reference.. For example, if you're collecting a name and age, and your card is called Flow_1, they'd be accessible in @ref_Flow_1.name and @ref_Flow_1.age. You can then use this data to update the user's profile, make API calls, branch the Journey, or whatever you'd like to do.
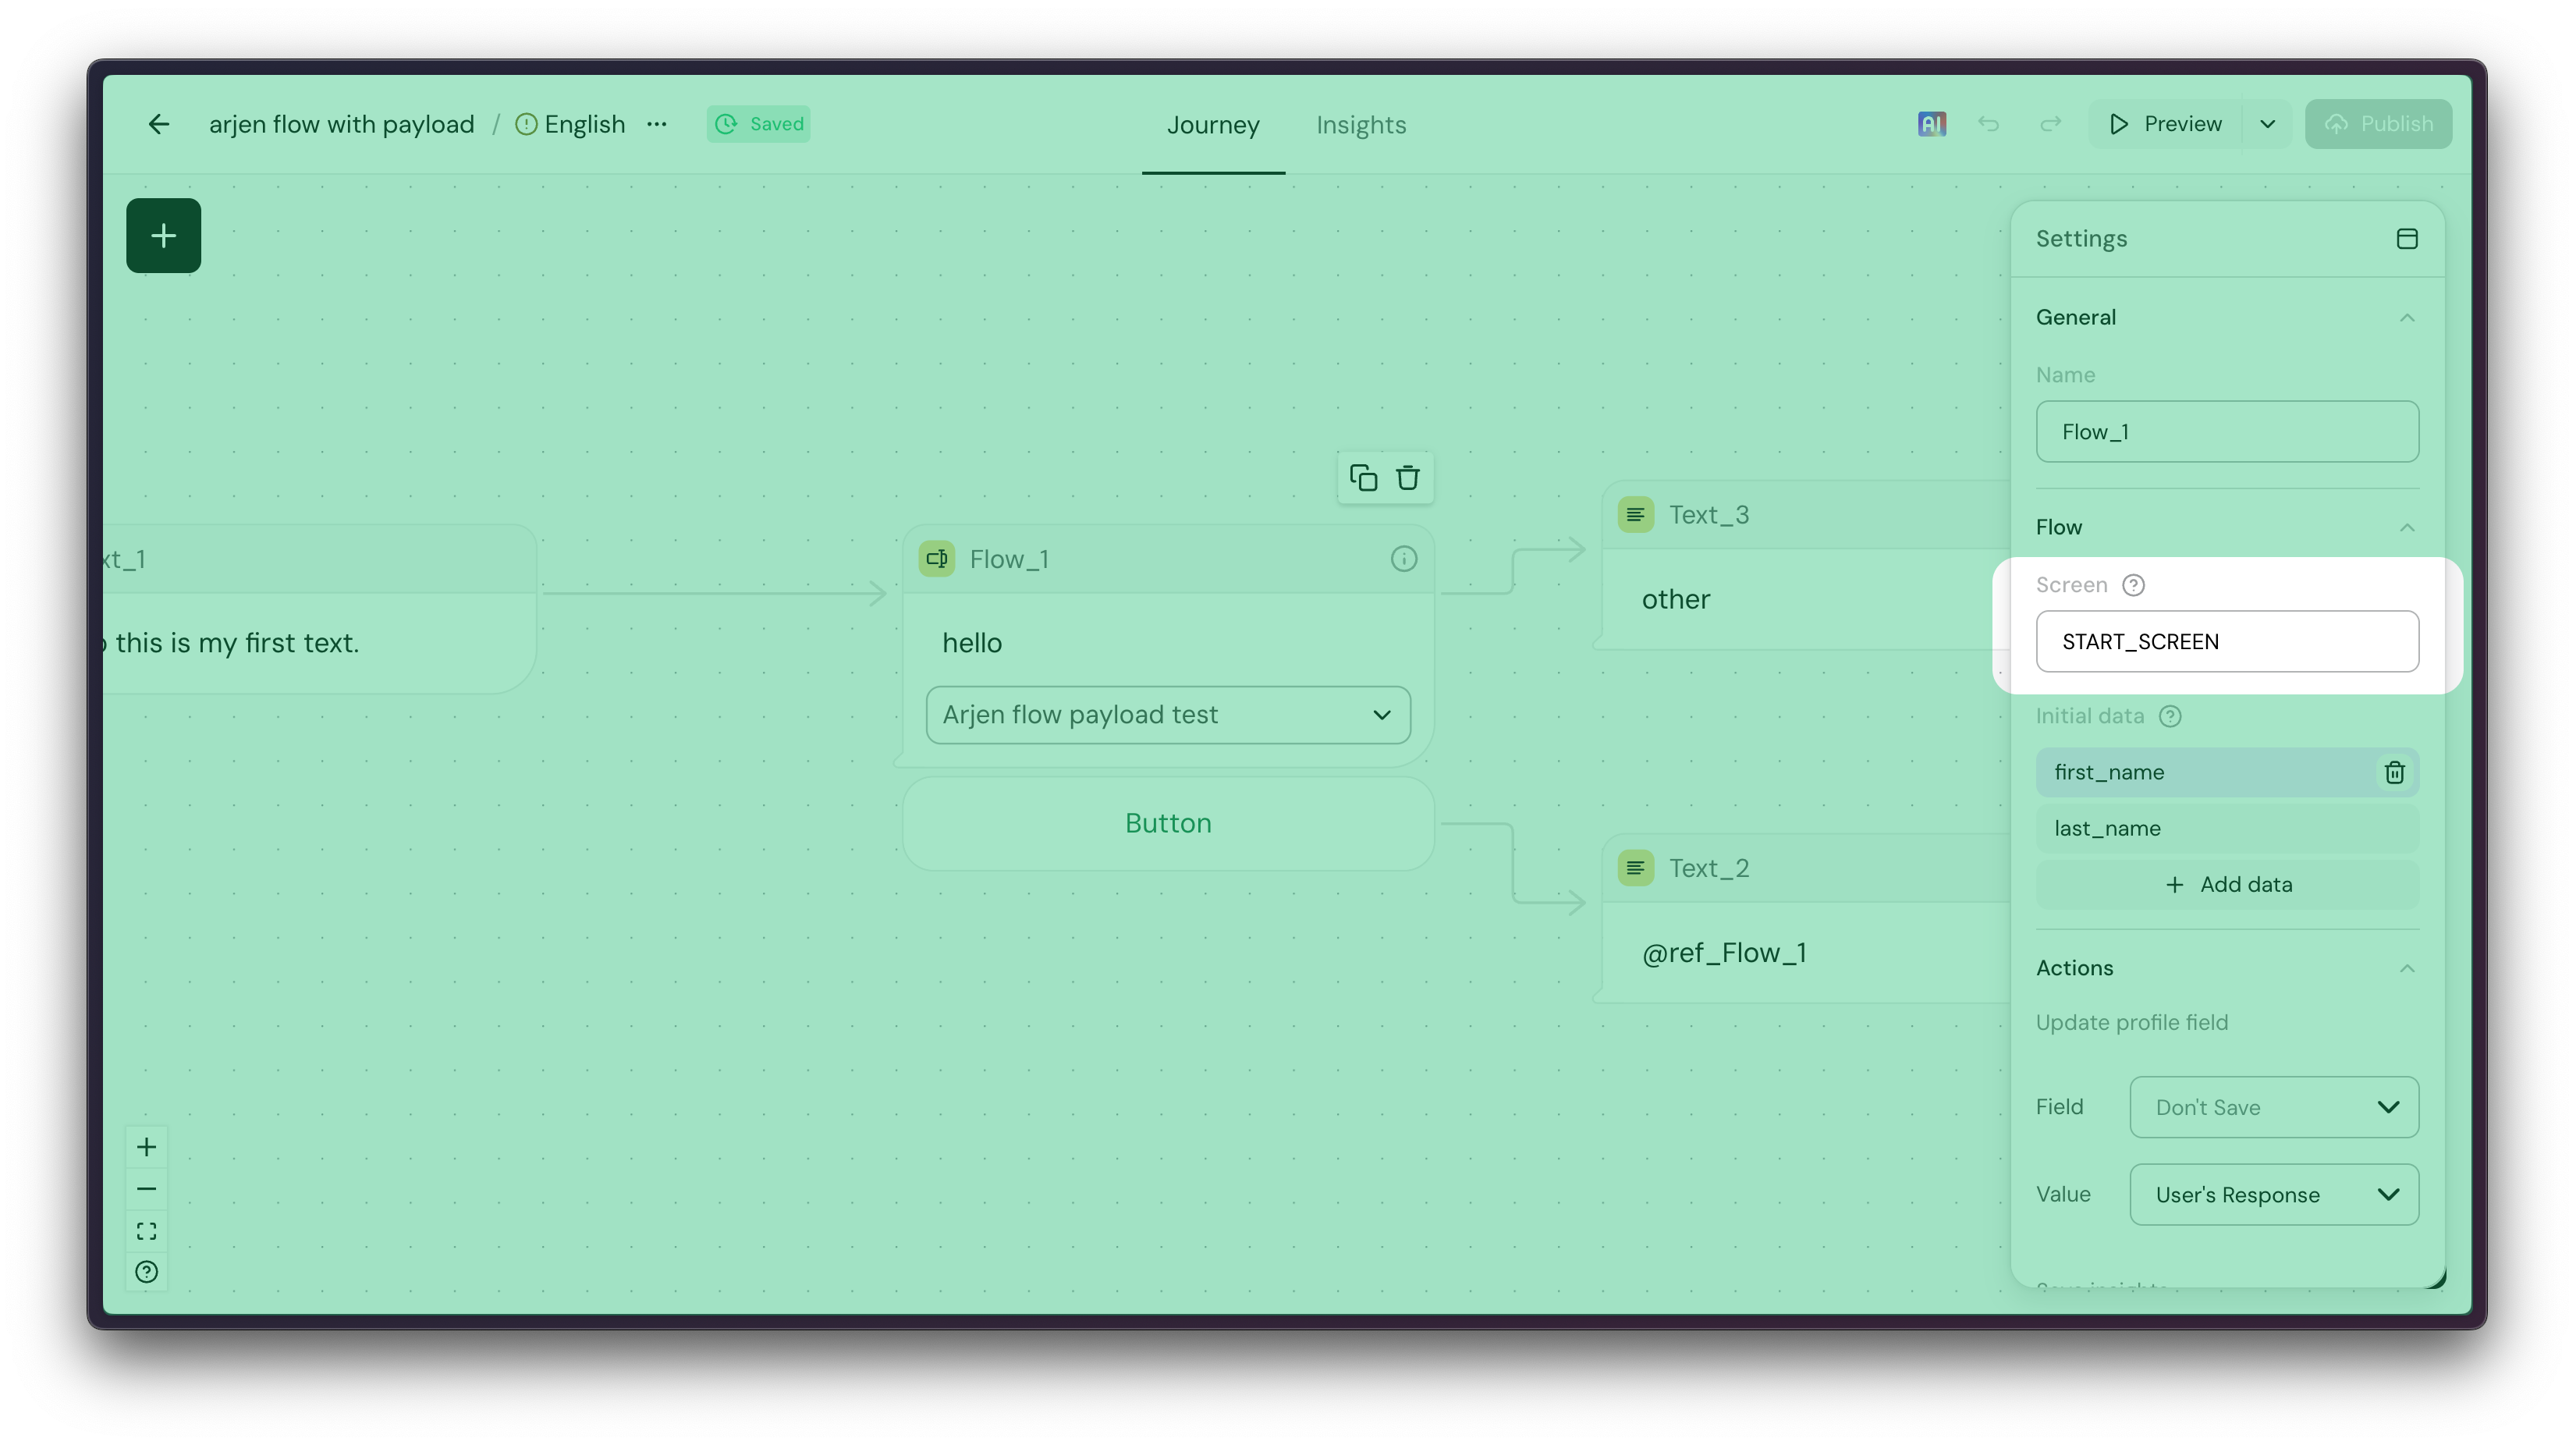
If your Flow has multiple screens, you can also specify which page it should start with by referencing that screen's id on the sidebar:
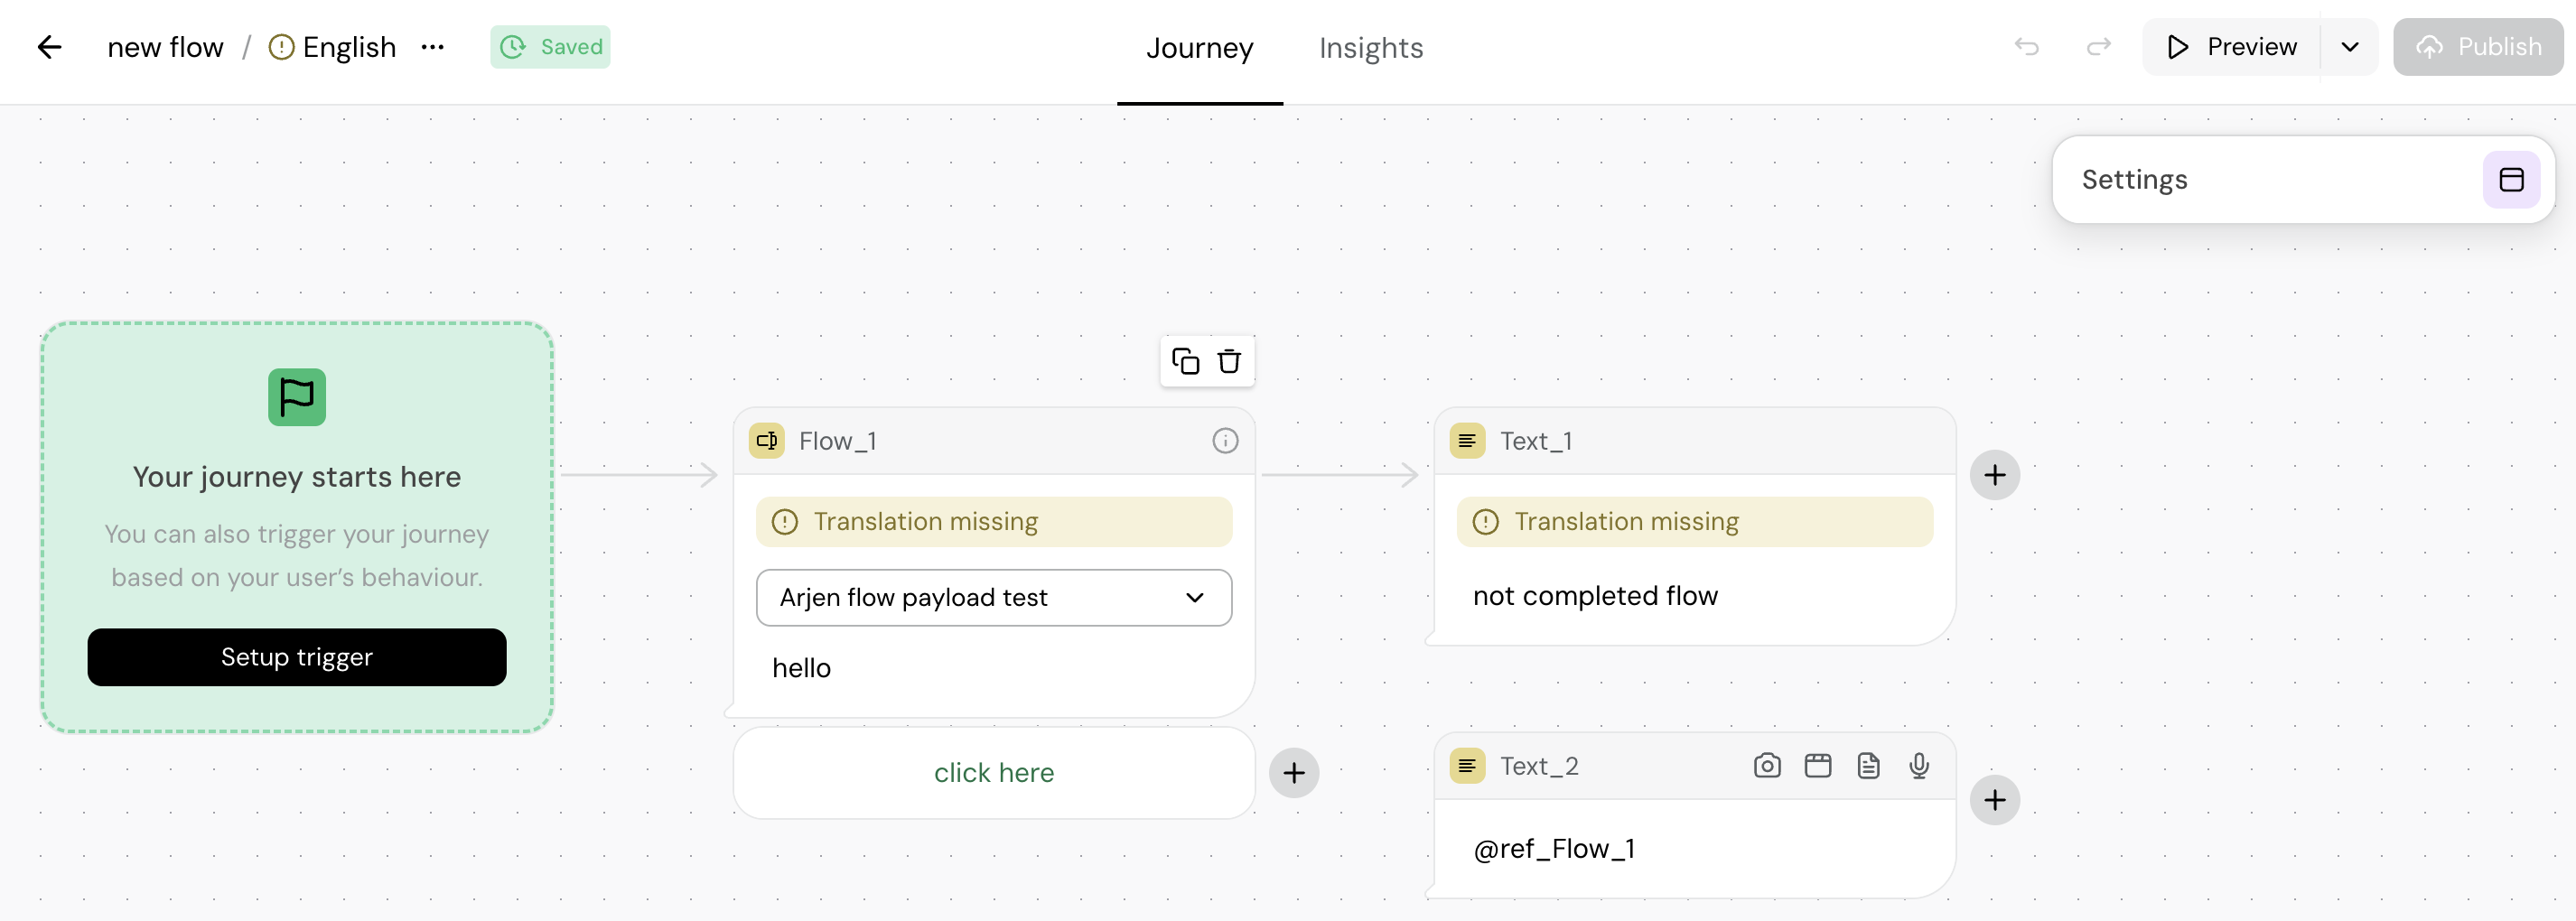
If during a Flow the user types a message back, the Journey will continue to the "not completed flow". If the user fills out the Flow after that, the journey will not go back on the Flow results path:
Flows can also be used to edit existing data. To do that, you can pass any data into a Flow using the Initial data data on the sidebar:
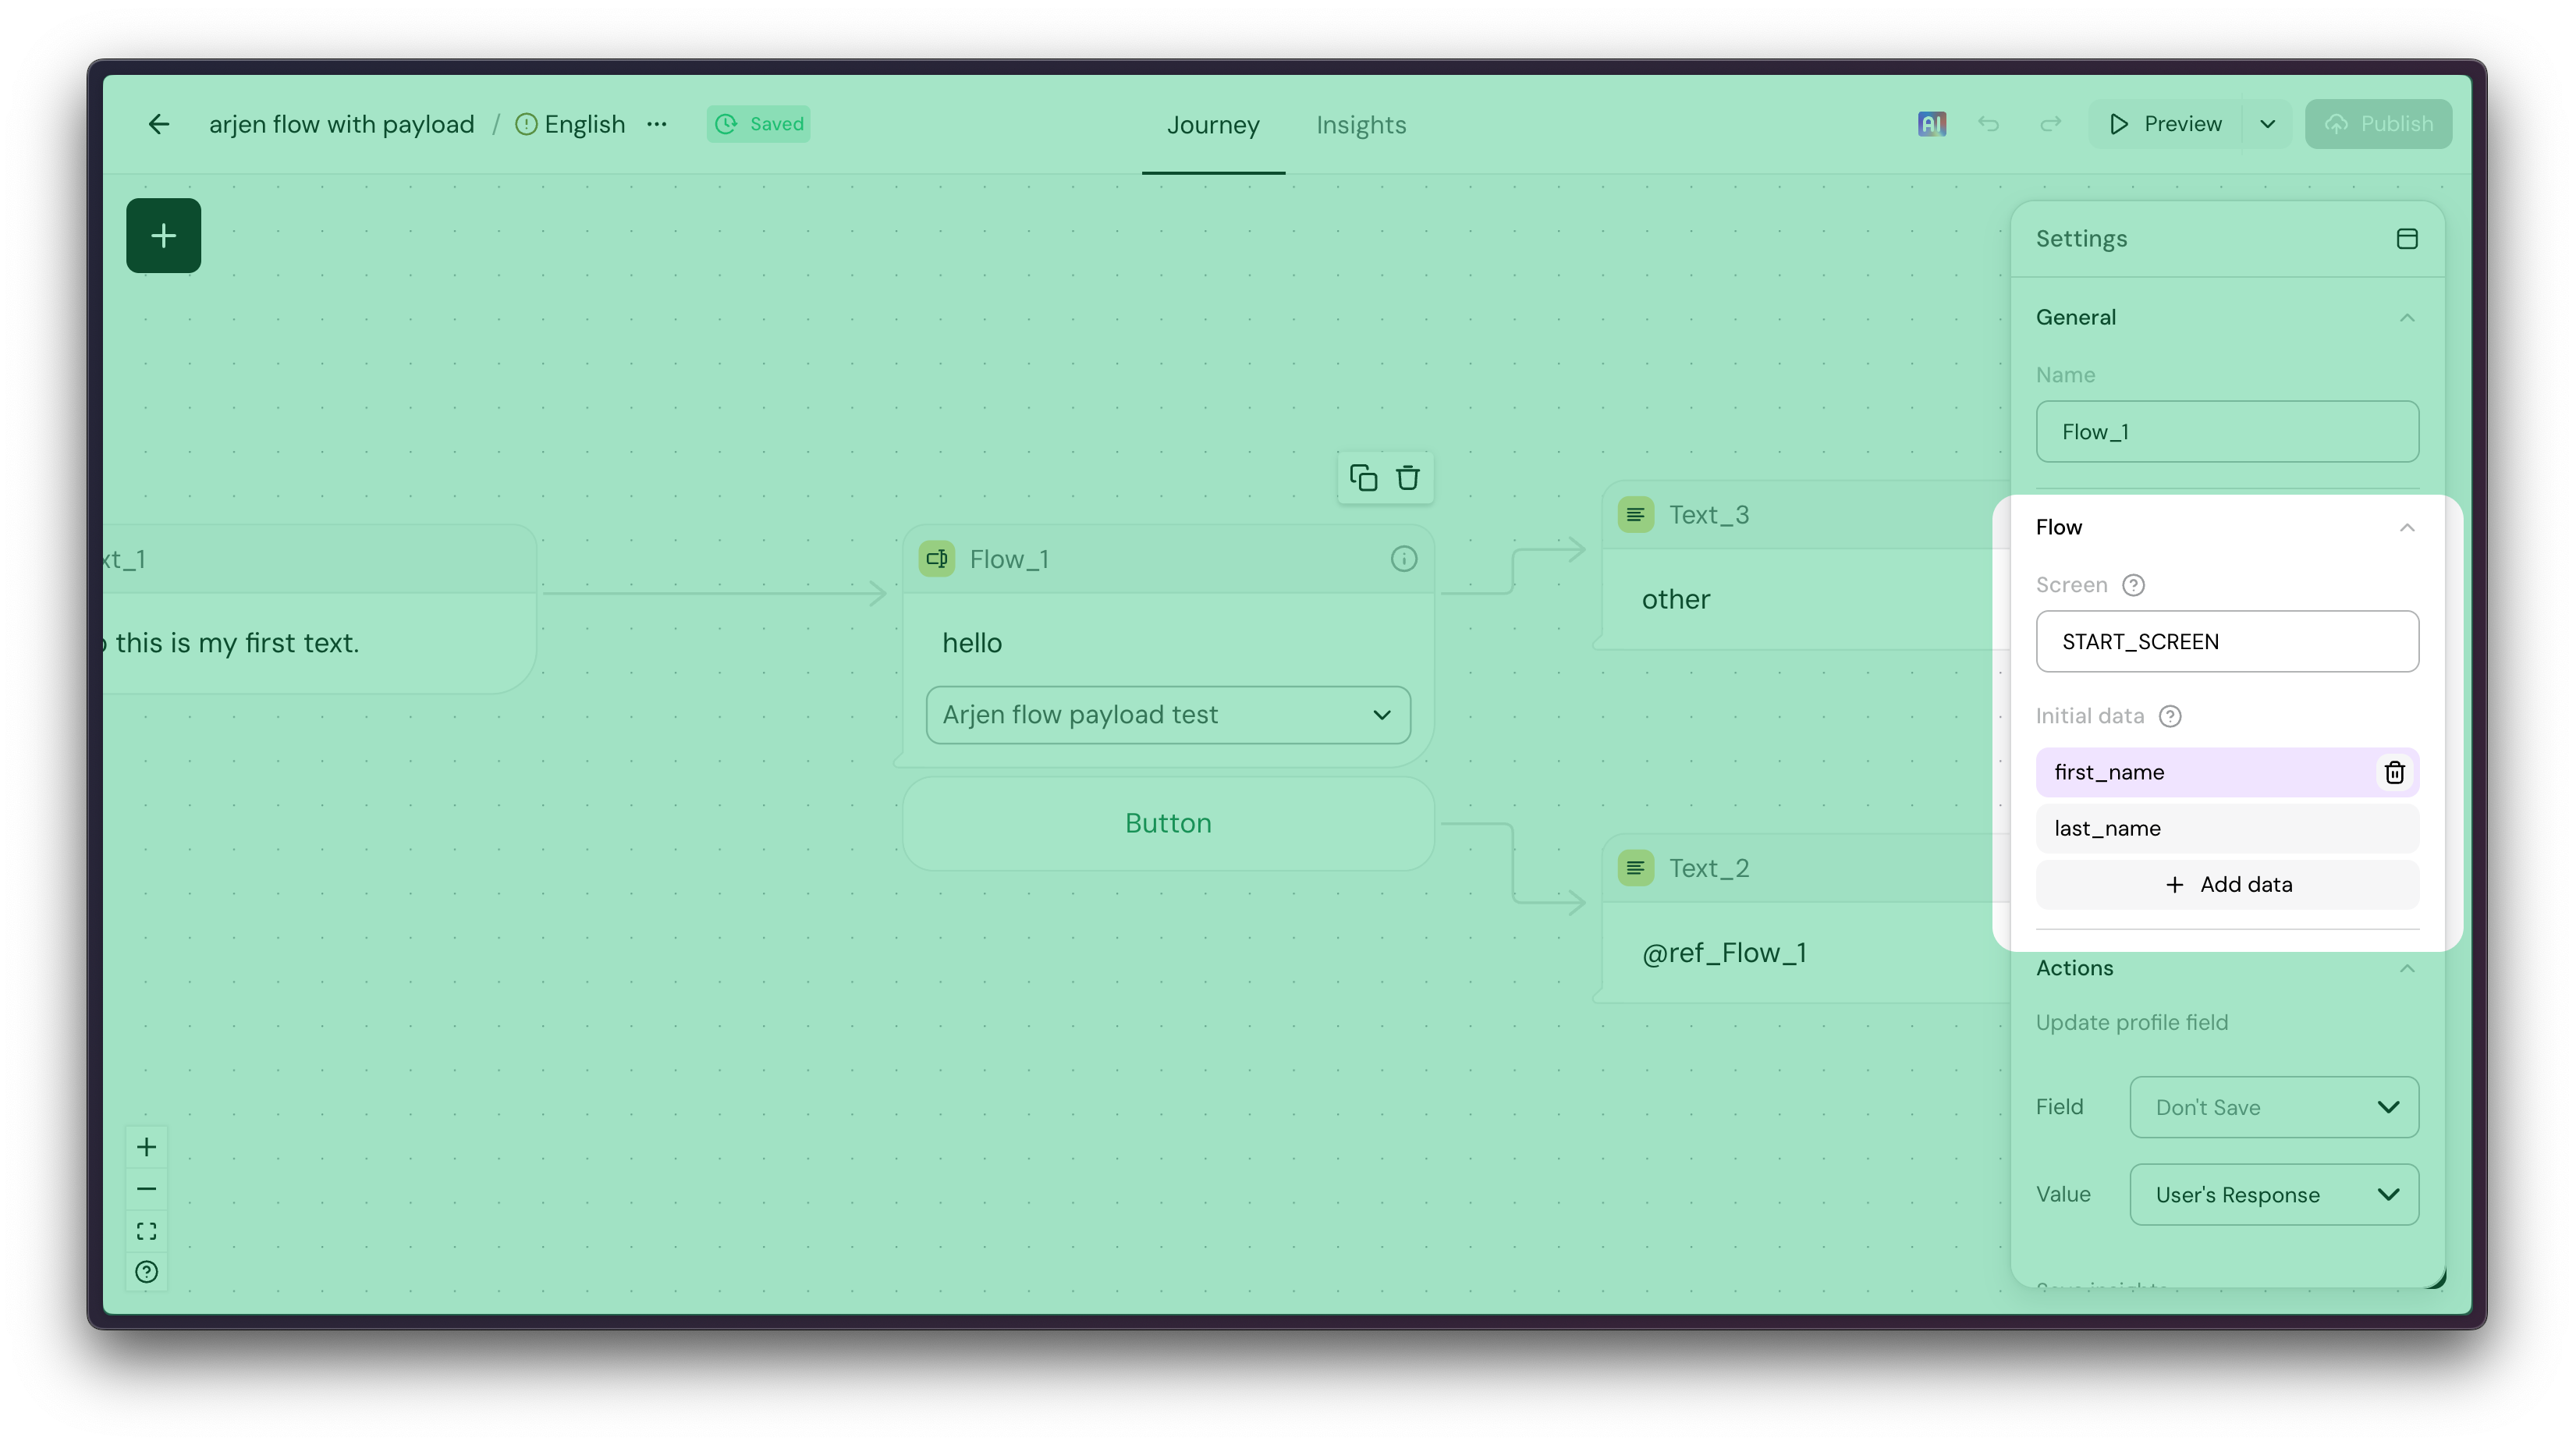
Flows also have the ability to use expressions and variables in this data. Using variables to prefill the Flow can be very powerful:

On your Flow JSON, you also need to be expecting this data. You need to define data in the WhatsApp flow definition, as well as init-value for each input field you're passing initial data for:
{
              "version": "7.2",
              "screens": [
                  {
                      "id": "START_SCREEN",
                      "title": "Hello World",
                      "terminal": true,
                      "success": true,
                      "data": {
                        "name": {
                            "type": "string",
                            "__example__": "John"
                        },
                      },
                      "layout": {
                          "type": "SingleColumnLayout",
                          "children": [
                              {
                                  "type": "TextInput",
                                  "name": "name",
                                  "label": "Name",
                                  "init-value": "${data.name}"
                              },
                              …
                          ]
                      }
                  }
              ]
          }
2.2 Use the code block
The code function to be used that allows you to send out a WhatsApp flow is:
whatsapp_flow("Continue", "your_flow_id", "APPOINTMENT_SCREEN")Parameter | Description |
Continue | The text to be displayed on the button that the flow generates. The flow only starts when the user clicks this button. |
your_flow_id | This can be found by navigating back to the Flow page where you create a flow from. Each flow has its "Flow ID" listed on this and you can copy this. |
APPOINTMENT_SCREEN | The name of the screen from the flow that should be shown at this point in time. A single flow can have multiple screens. For our code in Step 1 we only had this single screen. |
The documentation for using WhatsApp Flows on Turn.io within different scenarios can be found here. However, a simplistic example incorporating the flow code that we defined above is shown below.
card Flow do
            flow =
              whatsapp_flow("Continue", "your_flow's_id", "APPOINTMENT_SCREEN") do
                header("this is the header")
                text("this is the body")
                footer("this is the footer")
              end

            then(ThankYou when has_text(flow.date))
            then(Other)
          end

          card ThankYou do
            text("Thank you! Your appointment is scheduled for @flow.date")
          end

          card Other do
            text("You did not select a date.")
          end
The above allows you to send a flow to the user with a text body, a footer, a header and a button as showcased below. You can of course, choose to not send the text body, footer and header.

The subsequent lines of code within the code above allow you to access the date the users picket with the "@flow.date" variable. Any variable defined within the flow code can be accessed in this way once the flow ends. A Journey will not move forward up and until the flow either completes or the user cancels it. Which is why you can see that we check if the user did indeed select a date and branch our Journey on the basis of that.
Flow Templates
We've created a few templates to help you get started. Simply head into your WhatsApp Manager, create a new Flow, and paste the JSON code from any of the templates below there.
Patient registration
{
             "screens":[
                {
                   "data":{

                   },
                   "id":"Registration",
                   "layout":{
                      "children":[
                         {
                            "children":[
                               {
                                  "input-type":"text",
                                  "label":"First name",
                                  "name":"First_name",
                                  "required":true,
                                  "type":"TextInput"
                               },
                               {
                                  "input-type":"text",
                                  "label":"Last name",
                                  "name":"Last_name",
                                  "required":true,
                                  "type":"TextInput"
                               },
                               {
                                  "label":"Birthday",
                                  "name":"Birthday",
                                  "required":true,
                                  "type":"DatePicker"
                               },
                               {
                                  "data-source":[
                                     {
                                        "id":"0_Male",
                                        "title":"Male"
                                     },
                                     {
                                        "id":"1_Female",
                                        "title":"Female"
                                     },
                                     {
                                        "id":"2_Other",
                                        "title":"Other"
                                     },
                                     {
                                        "id":"3_Prefer_not_to_say",
                                        "title":"Prefer not to say"
                                     }
                                  ],
                                  "label":"Gender",
                                  "name":"Gender",
                                  "required":true,
                                  "type":"RadioButtonsGroup"
                               },
                               {
                                  "text":"Do you want to receive messages from us?",
                                  "type":"TextBody"
                               },
                               {
                                  "label":"Yes, I want to receive messages from you",
                                  "name":"Yes_I_want_to_receive_messages_from_you",
                                  "required":true,
                                  "type":"OptIn"
                               },
                               {
                                  "label":"Complete",
                                  "on-click-action":{
                                     "name":"complete",
                                     "payload":{
                                        "First_name":"${form.First_name}",
                                        "Last_name":"${form.Last_name}",
                                        "Birthday":"${form.Birthday}",
                                        "Gender":"${form.Gender}",
                                        "Opt_in":"${form.Yes_I_want_to_receive_messages_from_you}"
                                     }
                                  },
                                  "type":"Footer"
                               }
                            ],
                            "name":"flow_path",
                            "type":"Form"
                         }
                      ],
                      "type":"SingleColumnLayout"
                   },
                   "terminal":true,
                   "title":"Registration"
                }
             ],
             "version":"7.2"
          }
Appointment booking
{
             "screens":[
                {
                   "data":{

                   },
                   "id":"Booking",
                   "layout":{
                      "children":[
                         {
                            "children":[
                               {
                                  "data-source":[
                                     {
                                        "id":"0_General_appointment",
                                        "title":"General appointment"
                                     },
                                     {
                                        "id":"1_Pediatric_appointment",
                                        "title":"Pediatric appointment"
                                     },
                                     {
                                        "id":"2_Follow-up",
                                        "title":"Follow-up"
                                     },
                                     {
                                        "id":"3_Exam",
                                        "title":"Exam"
                                     },
                                     {
                                        "id":"4_Emergency",
                                        "title":"Emergency"
                                     }
                                  ],
                                  "label":"Reason for visit",
                                  "name":"Reason_for_visit",
                                  "required":true,
                                  "type":"RadioButtonsGroup"
                               },
                               {
                                  "data-source":[
                                     {
                                        "id":"0_Clinic_A",
                                        "title":"Clinic A"
                                     },
                                     {
                                        "id":"1_Clinic_B",
                                        "title":"Clinic B"
                                     },
                                     {
                                        "id":"2_Clinic_C",
                                        "title":"Clinic C"
                                     }
                                  ],
                                  "label":"Clinic",
                                  "name":"Clinic",
                                  "required":true,
                                  "type":"Dropdown"
                               },
                               {
                                  "label":"Preferred date",
                                  "name":"Preferred_date",
                                  "required":true,
                                  "type":"DatePicker"
                               },
                               {
                                  "data-source":[
                                     {
                                        "id":"0_8:00-9:00",
                                        "title":"8:00-9:00"
                                     },
                                     {
                                        "id":"1_9:00-10:00",
                                        "title":"9:00-10:00"
                                     },
                                     {
                                        "id":"2_10:00-11:00",
                                        "title":"10:00-11:00"
                                     },
                                     {
                                        "id":"3_11:00-12:00",
                                        "title":"11:00-12:00"
                                     },
                                     {
                                        "id":"4_12:00-13:00",
                                        "title":"12:00-13:00"
                                     },
                                     {
                                        "id":"5_13:00-14:00",
                                        "title":"13:00-14:00"
                                     },
                                     {
                                        "id":"6_14:00-15:00",
                                        "title":"14:00-15:00"
                                     },
                                     {
                                        "id":"7_15:00-16:00",
                                        "title":"15:00-16:00"
                                     },
                                     {
                                        "id":"8_16:00-17:00",
                                        "title":"16:00-17:00"
                                     },
                                     {
                                        "id":"9_17:00-18:00",
                                        "title":"17:00-18:00"
                                     }
                                  ],
                                  "label":"Preferred time",
                                  "name":"Preferred_time",
                                  "required":true,
                                  "type":"CheckboxGroup"
                               },
                               {
                                  "label":"Book",
                                  "on-click-action":{
                                     "name":"complete",
                                     "payload":{
                                        "Reason_for_visit":"${form.Reason_for_visit}",
                                        "Clinic":"${form.Clinic}",
                                        "Preferred_date":"${form.Preferred_date}",
                                        "Preferred_time":"${form.Preferred_time}"
                                     }
                                  },
                                  "type":"Footer"
                               }
                            ],
                            "name":"flow_path",
                            "type":"Form"
                         }
                      ],
                      "type":"SingleColumnLayout"
                   },
                   "terminal":true,
                   "title":"Book your appointment"
                }
             ],
             "version":"7.2"
          }
Patient intake
{
"screens":[
{
"data":{
},
"id":"Current_visit",
"layout":{
"children":[
{
"children":[
{
"type":"TextArea",
"label":"Reason for visit",
"required":true,
"name":"Reason_for_visit",
"helper-text":"Tell us about why you're here and any symptoms you have"
},
{
"input-type":"text",
"label":"Symptom duration",
"name":"Symptom_duration",
"required":true,
"type":"TextInput",
"helper-text":"How long have you felt these?"
},
{
"label":"Next",
"on-click-action":{
"name":"navigate",
"next":{
"name":"Medical_history",
"type":"screen"
},
"payload":{
"Reason_for_visit":"${form.Reason_for_visit}",
"Symptom_duration":"${form.Symptom_duration}"
}
},
"type":"Footer"
}
],
"name":"flow_path",
"type":"Form"
}
],
"type":"SingleColumnLayout"
},
"title":"Current visit"
},
{
"data":{
"Reason_for_visit":{
"__example__":"Example",
"type":"string"
},
"Symptom_duration":{
"__example__":"Example",
"type":"string"
}
},
"id":"Medical_history",
"layout":{
"children":[
{
"children":[
{
"text":"Please fill these to the best of your ability. Skip anything you're unsure about.",
"type":"TextBody"
},
{
"data-source":[
{
"id":"0_Fatigue",
"title":"Fatigue"
},
{
"id":"1_Fever",
"title":"Fever"
},
{
"id":"2_Weight_changes",
"title":"Weight changes"
},
{
"id":"3_Chest_pain",
"title":"Chest pain"
},
{
"id":"4_Cough_/_Shortness_of_breath",
"title":"Cough / Shortness of breath"
},
{
"id":"5_Nausea_/_Abdominal_pain",
"title":"Nausea / Abdominal pain"
},
{
"id":"6_Joint_pain_/_Muscle_aches",
"title":"Joint pain / Muscle aches"
},
{
"id":"7_Headache/Dizziness",
"title":"Headache/Dizziness"
},
{
"id":"8_Anxiety_/_Depression",
"title":"Anxiety / Depression"
}
],
"label":"Recent conditions",
"name":"Recent_conditions",
"required":false,
"type":"CheckboxGroup"
},
{
"data-source":[
{
"id":"0_Diabetes_(Type_1_or_2)",
"title":"Diabetes (Type 1 or 2)"
},
{
"id":"1_High_blood_pressure",
"title":"High blood pressure"
},
{
"id":"2_Asthma",
"title":"Asthma"
},
{
"id":"3_COPD",
"title":"COPD"
},
{
"id":"4_Arthritis",
"title":"Arthritis"
},
{
"id":"5_Mental_Health_Issues",
"title":"Mental Health Issues"
},
{
"id":"6_Other",
"title":"Other"
},
{
"id":"7_Option",
"title":"Option"
}
],
"label":"Chronic Conditions",
"name":"Chronic_Conditions",
"required":false,
"type":"CheckboxGroup"
},
{
"data-source":[
{
"id":"0_Yes",
"title":"Yes"
},
{
"id":"1_No",
"title":"No"
}
],
"label":"Recent hospitalizations",
"name":"Recent_hospitalizations",
"required":false,
"type":"RadioButtonsGroup"
},
{
"label":"Medications",
"name":"Medications",
"required":false,
"type":"TextArea",
"helper-text":"Are you under any medications?"
},
{
"label":"Allergies",
"name":"Allergies",
"required":false,
"type":"TextArea",
"helper-text":"Any known allergies?"
},
{
"label":"Continue",
"on-click-action":{
"name":"navigate",
"next":{
"name":"Family_history",
"type":"screen"
},
"payload":{
"Recent_conditions":"${form.Recent_conditions}",
"Chronic_Conditions":"${form.Chronic_Conditions}",
"Recent_hospitalizations":"${form.Recent_hospitalizations}",
"Medications":"${form.Medications}",
"Allergies":"${form.Allergies}",
"Reason_for_visit":"${data.Reason_for_visit}",
"Symptom_duration":"${data.Symptom_duration}"
}
},
"type":"Footer"
}
],
"name":"flow_path",
"type":"Form"
}
],
"type":"SingleColumnLayout"
},
"title":"Medical history"
},
{
"data":{
"Recent_conditions":{
"__example__":[
],
"items":{
"type":"string"
},
"type":"array"
},
"Chronic_Conditions":{
"__example__":[
],
"items":{
"type":"string"
},
"type":"array"
},
"Recent_hospitalizations":{
"__example__":"Example",
"type":"string"
},
"Medications":{
"__example__":"Example",
"type":"string"
},
"Allergies":{
"__example__":"Example",
"type":"string"
},
"Reason_for_visit":{
"__example__":"Example",
"type":"string"
},
"Symptom_duration":{
"__example__":"Example",
"type":"string"
}
},
"id":"Family_history",
"layout":{
"children":[
{
"children":[
{
"data-source":[
{
"id":"0_Heart_disease",
"title":"Heart disease"
},
{
"id":"1_Diabetes",
"title":"Diabetes"
},
{
"id":"2_High_blood_pressure",
"title":"High blood pressure"
},
{
"id":"3_Cancer",
"title":"Cancer"
},
{
"id":"4_Stroke",
"title":"Stroke"
},
{
"id":"5_Other_hereditary_conditions",
"title":"Other hereditary conditions"
}
],
"label":"Family_history",
"name":"Family_history",
"required":false,
"type":"CheckboxGroup"
},
{
"label":"Continue",
"on-click-action":{
"name":"navigate",
"next":{
"name":"Lifestyle",
"type":"screen"
},
"payload":{
"Family_history":"${form.Family_history}",
"Recent_conditions":"${data.Recent_conditions}",
"Chronic_Conditions":"${data.Chronic_Conditions}",
"Recent_hospitalizations":"${data.Recent_hospitalizations}",
"Medications":"${data.Medications}",
"Allergies":"${data.Allergies}",
"Reason_for_visit":"${data.Reason_for_visit}",
"Symptom_duration":"${data.Symptom_duration}"
}
},
"type":"Footer"
}
],
"name":"flow_path",
"type":"Form"
}
],
"type":"SingleColumnLayout"
},
"title":"Family history"
},
{
"data":{
"Family_history":{
"__example__":[
],
"items":{
"type":"string"
},
"type":"array"
},
"Recent_conditions":{
"__example__":[
],
"items":{
"type":"string"
},
"type":"array"
},
"Chronic_Conditions":{
"__example__":[
],
"items":{
"type":"string"
},
"type":"array"
},
"Recent_hospitalizations":{
"__example__":"Example",
"type":"string"
},
"Medications":{
"__example__":"Example",
"type":"string"
},
"Allergies":{
"__example__":"Example",
"type":"string"
},
"Reason_for_visit":{
"__example__":"Example",
"type":"string"
},
"Symptom_duration":{
"__example__":"Example",
"type":"string"
}
},
"id":"Lifestyle",
"layout":{
"children":[
{
"children":[
{
"input-type":"text",
"label":"Occupation",
"name":"Occupation",
"required":false,
"type":"TextInput"
},
{
"data-source":[
{
"id":"0_Yes",
"title":"Yes"
},
{
"id":"1_No",
"title":"No"
}
],
"label":"Do you smoke?",
"name":"Do_you_smoke",
"required":false,
"type":"RadioButtonsGroup"
},
{
"data-source":[
{
"id":"0_Yes",
"title":"Yes"
},
{
"id":"1_No",
"title":"No"
}
],
"label":"Do you drink?",
"name":"Do_you_drink",
"required":false,
"type":"RadioButtonsGroup"
},
{
"data-source":[
{
"id":"0_Frequently",
"title":"Frequently"
},
{
"id":"1_Sometimes",
"title":"Sometimes"
},
{
"id":"2_Never",
"title":"Never"
}
],
"label":"Exercising habit",
"name":"Exercising_habit",
"required":false,
"type":"RadioButtonsGroup"
},
{
"label":"Complete",
"on-click-action":{
"name":"complete",
"payload":{
"Occupation":"${form.Occupation}",
"Do_you_smoke":"${form.Do_you_smoke}",
"Do_you_drink":"${form.Do_you_drink}",
"Exercising_habit":"${form.Exercising_habit}",
"Family_history":"${data.Family_history}",
"Recent_conditions":"${data.Recent_conditions}",
"Chronic_Conditions":"${data.Chronic_Conditions}",
"Recent_hospitalizations":"${data.Recent_hospitalizations}",
"Medications":"${data.Medications}",
"Allergies":"${data.Allergies}",
"Reason_for_visit":"${data.Reason_for_visit}",
"Symptom_duration":"${data.Symptom_duration}"
}
},
"type":"Footer"
}
],
"name":"flow_path",
"type":"Form"
}
],
"type":"SingleColumnLayout"
},
"terminal":true,
"title":"Lifestyle"
}
],
"version":"7.2"
}Date picker
{
             "screens":[
                {
                   "data":{

                   },
                   "id":"RECOMMEND",
                   "layout":{
                      "children":[
                         {
                            "children":[
                               {
                                  "label":"Date",
                                  "name":"Date",
                                  "required":true,
                                  "type":"DatePicker"
                               },
                               {
                                  "label":"Send",
                                  "on-click-action":{
                                     "name":"complete",
                                     "payload":{
                                        "screen_0_Birthday_0":"${form.Date}"
                                     }
                                  },
                                  "type":"Footer"
                               }
                            ],
                            "name":"flow_path",
                            "type":"Form"
                         }
                      ],
                      "type":"SingleColumnLayout"
                   },
                   "terminal":true,
                   "title":"Pick a date"
                }
             ],
             "version":"7.2"
          }